How To Use Analog Gear With Pro Tools

Introduction
Analog gear and recording techniques can give your musical creations a unique and desirable warmth and character. However, seamlessly incorporating these into your digital Pro Tools workflow can be a challenge.
This article will provide step-by-step instructions, best practices, recommended equipment, and insider tips and tricks to help you integrate analog gear with Pro Tools. To make the process easier to understand, consider that if you've already connected a microphone to your audio interface for recording in Pro Tools, you already have the basic knowledge.
Just like recording your voice through a microphone and into Pro Tools via your audio interface, analog gear works on the same principle. The only difference is that instead of recording your voice, the sound being recorded is generated by an external synthesizer or other analog equipment. So, let's dive in.
Table Of Contents
- Introduction
- Equipment Needed
- Corresponding Inputs and Outputs
- Discover the Method for Bypassing Hardware Inserts in Pro Tools
- Delay Correction
- Enabling Automatic Delay Compensation
- Setting Up The Session
- Incorporating Hardware Insert
- Preparing for the Test Measurement
- Measuring Round-Trip Latency
- Determining the Delay Introduced by an Outboard Processor through Examination of Audio Track Differences
- Conclusion
Equipment Needed
Now, let's talk about the equipment you'll require to begin.
To use analog gear with Pro Tools, you'll need the following: An audio interface with at least one additional input and output, in addition to the ones used for your studio monitors, capable of handling the analog signal from your gear.
An analog device like a synthesizer or drum machine. A cable to connect your analog device to the audio interface. With these components in place, you will be able to seamlessly integrate your analog gear into your digital workflow in Pro Tools.
Corresponding Inputs and Outputs
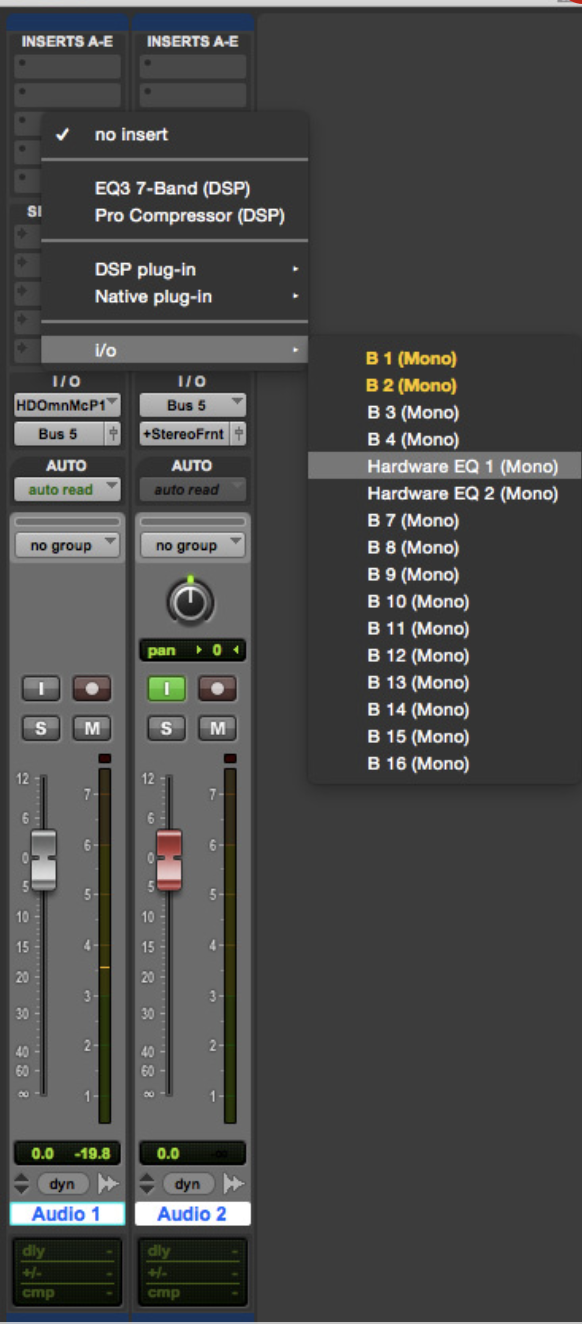
When incorporating hardware units into your Pro Tools setup using your interface I/O as insert points, it is crucial to ensure that you use matching input and output numbers. For instance, if you want to send audio through a hardware compressor on output 5, the audio must return to Pro Tools through input 5. This is because the Inserts tab in the Pro Tools I/O window is set up in a way that requires matching I/O for send and return. To simplify the process, I highly recommend labeling your inputs and outputs and naming them based on the devices they are connected to. This avoids the need to constantly keep track of which input or output corresponds to which device.:
In Pro Tools, you can label the hardware insert points in the Insert tab of the I/O window. For example, I can designate channels 5 and 6 on my HD I/O for use with a hardware EQ. By double-clicking on the stereo insert, I can label both channels at once. In this case,

We would rename "B 5-6" to "Hardware EQ". The mono sub-paths, which can be accessed by clicking on the triangle, will be automatically named "Hardware EQ.L" and "Hardware EQ.R", but I can use the same labeling process to change them to "Hardware EQ 1" and "Hardware EQ 2". Naming the inputs and outputs according to the devices that are connected to them saves time and eliminates the need to remember which device is connected to which input/output.
To utilize a hardware insert, first, click on one of the available insert points on a track in Pro Tools. Instead of selecting a plug-in, navigate to the bottom of the list and choose I/O. Here, you will see all the interface I/O that can be utilized as insert points. In this screen, inputs or outputs B1 and B2 may appear as yellow, indicating that they are currently being used in the session. Additionally, you will see the renamed inserts "Hardware EQ 1" and "Hardware EQ 2".
Discover the Method for Bypassing Hardware Inserts in Pro Tools
It's important to note that, unlike software plug-ins, hardware inserts do not feature a bypass button as it is part of the plug-in, not the mixer insert. To bypass a hardware insert, one must deactivate it. This can be achieved by right-clicking on the insert name and selecting "Make Inactive." The hardware insert name will appear in italics and the insert on the track will appear grayed out. To reactivate the hardware insert, right-click again and select "Make Active."
Incorporating auxiliary effects units, such as reverb and delay, into your Pro Tools workflow does not require matching hardware inputs and outputs. You can directly send source tracks to the hardware output that drives the reverb and use an auxiliary track as the return channel to capture the inputs connected to the reverb's outputs. However, if you prefer to use the effects units as inserts, you may match the hardware inputs and outputs as described previously.
Delay Correction
Delaying audio when transferring it to and from an external processor is a common occurrence. The audio first exits the output buffer and digital-to-analog converter of the interface and then travels through the hardware processor. Finally, it re-enters the interface through its digital-to-analog converter and input buffer for use in Pro Tools.
The time lag for the first and last stages is constant, as the interface setup is the same, and Pro Tools automatically compensates for them.
Some outboard units, however, introduce their own latency that must be compensated for. To manage this effectively, it is advisable to measure the round-trip latency. In this article, I will show you how to do so in Pro Tools.
Enabling Automatic Delay Compensation
Before you begin, make sure that the Automatic Delay Compensation is enabled in the Options menu. If you are using Pro Tools 10 or earlier, you also need to select one of the following options: Short, Long, or Maximum. From Pro Tools 11 onwards, this selection is no longer necessary.
Setting Up The Session
Set the Main Time Scale of your session to Min: Sec. Then, create two mono audio tracks. Record a brief tone segment on the first track. You can do this by highlighting a 50ms section of the track, selecting Signal Generator from the AudioSuite menu, and clicking Render. Or, you can use any audio sample that clearly indicates the start of the audio.
Incorporating Hardware Insert
The next step is to add a hardware insert on the track. For this demonstration, input and output 5 from the HD I/O will be used, and it will be referred to as "Hardware EQ 1."
Preparing for the Test Measurement
It is important to configure the hardware processor such that it only passes the dry signal. The audio must go through the entire processing chain, including any delay added, so it is crucial to avoid a true bypass mode. To do this, adjust the compressor controls to prevent compression and set the EQ controls to a flat position. If you are using a reverb or delay, adjust the output to 100% dry to ensure that the audio passes through the processor without interfering with the test measurement.
Measuring Round-Trip Latency
To measure the round-trip latency, route the audio output of the first track to the input of the second track. Highlight the clip on the first track to restrict recording only to the duration of this clip. Activate record on the second track and then engage Record and Play mode in the Transport window. Pro Tools will then play back the audio on the first track and capture it, through the external processor, on the second track.
Determining the Delay Introduced by an Outboard Processor through Examination of Audio Track Differences
To determine the delay introduced by the outboard processor, after recording, it is necessary to closely examine the difference in the starting point of audio in both tracks. One method of measuring this offset is by positioning the cursor at the start of the audio waveform in the second track and using the keyboard shortcut Alt+Shift+Tab to navigate to the beginning of the corresponding clip in the first track, thereby highlighting the difference in their starting points.
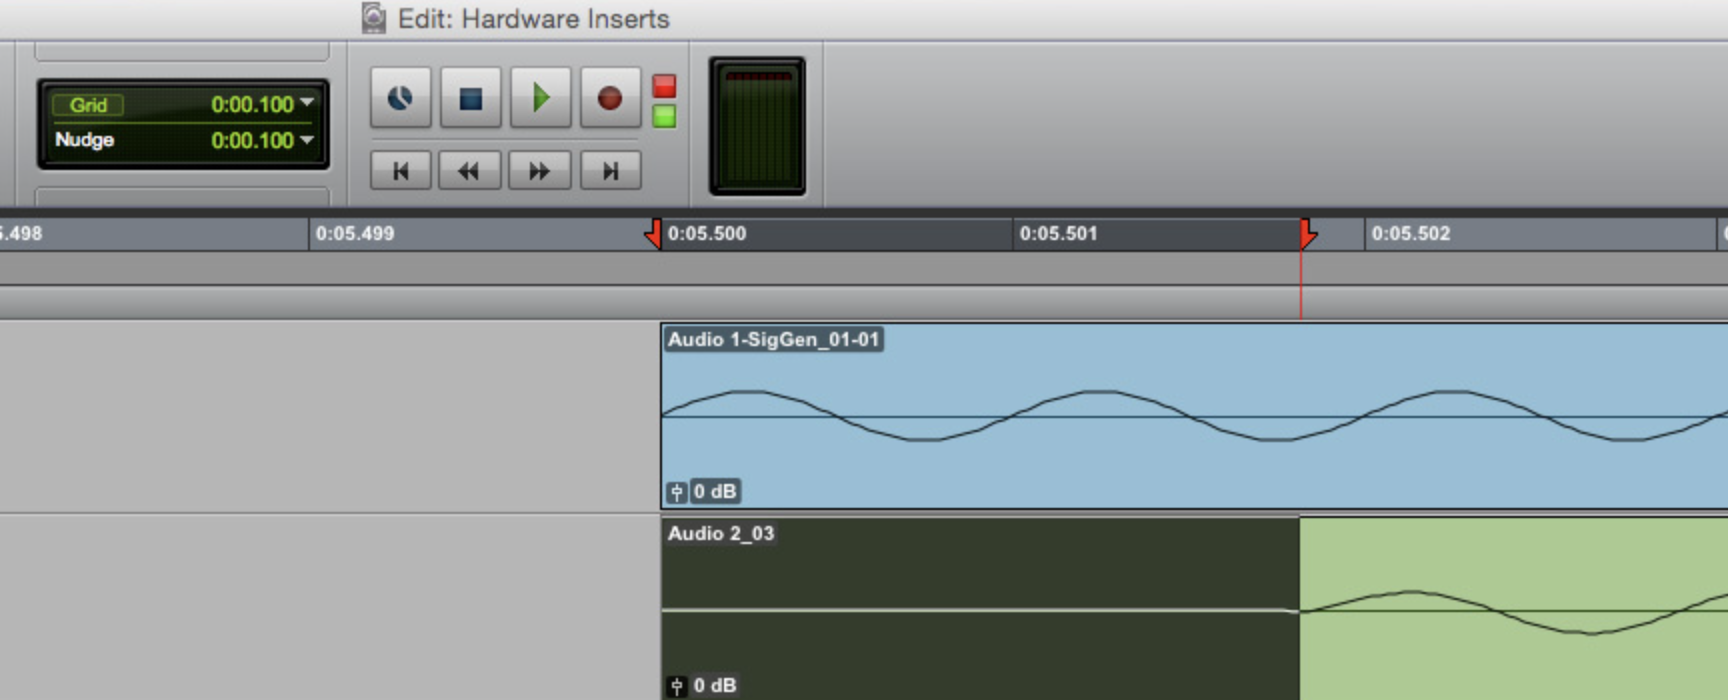
The highlighted area represents the latency introduced by the processing in the first track. To accurately measure the delay, examine the length of this selected area. Note that the timeline may not display time increments below 1 millisecond, so it is advisable to consult the time ruler when zoomed in. The measured delay can then be entered into the Hardware Insert Delay tab in the Pro Tools I/O Setup window. For example, in this case, the delay was approximately 1.75 milliseconds.
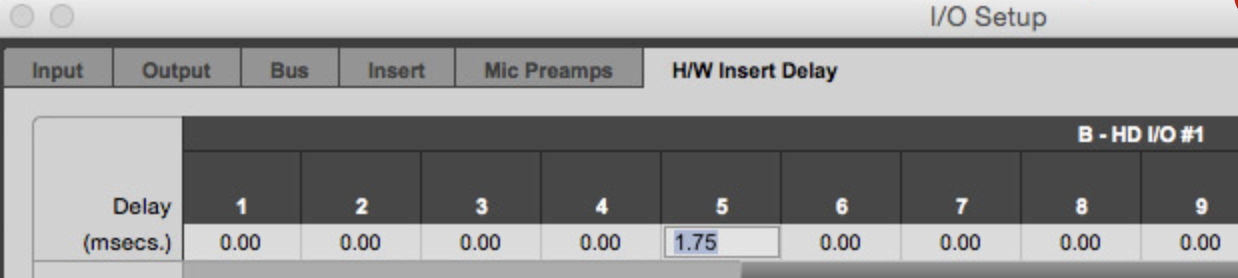
Having determined and recorded the delay, the compensation engine will now factor in both the latency of the external processor and the delay incurred through a hardware insert. This allows for seamless integration of your preferred hardware processor into your Pro Tools Session without the need for manual adjustment to compensate for round-trip delays.
Conclusion
Bringing analog gear into your Pro Tools setup is a great way to add depth and character to your musical creations. With the right gear and setup, you can effortlessly merge the best of both worlds and tap into the unique sound of analog equipment. With the knowledge you've gained through this article, you can maximize the potential of your analog gear and Pro Tools, unleashing your creative spirit and producing the music of your dreams." So gear up and let the music production journey begin!
Hybrid Setups Are Worth the Patience
Once H/W Insert Delay is dialed in, hybrid audio production feels seamless — analog color with digital recall. It's a small setup cost for a workflow that keeps music creation fast and your converters honest.
Related Articles
- How To Use Analog Gear With FL Studio
- How to calibrate my monitors?
- How to record clean vocals?
- The 7 Best Mics for Recording Vocals in 2025 🎤 (Budget to Pro)
- When and how to use compression in music production.
- What is the Difference Between Mixing and Mastering?
- How To Use Analog Gear With Logic Pro
- How To Use Analog Gear With Ableton Live